December 31, 2012

Goodbye (2012). And Hello (2013).

2012. It will go down as one the best. years. ever (in my life). Ha. In the last hours of this great year, I am saying goodbye to 2012 and to this blog. It has been a great few years of inconsistent posting and learning about blogging, finding my own voice, lots of recipes, lots of growing food, lots of pictures, and lots of love. The Rhythm of Cooking was fun and the premise will forever live on in my kitchen through loud music, hefty glasses of wine, and a whole lotta food.

Here's the good news. While I won't be here at this website, I will still be blogging and writing over at our new site: hop on over to Callywood Farms Blog. I have migrated all the recipes from this blog over so you can find them there and we will to continue to post the yummy things we eat. We hope to add a lot more about our new homestead like our chickens and the other animals we hope join us in the future, all of the projects we attempt, rural living escapades, and our growing family!

Please re-subscribe to the email list. It's on the top right still. Add the new domain to your reader, whatever floats your boat. Thanks for joining us here on Rhythm of Cooking for the past few years. We hope you'll continue to read on over at Callywood Farms!

Cheers to 2013, friends.


June 10, 2012

One Pot Collards and Cornbread

Music: Tedeschi Trucks Band, Revelator. If you haven't heard this album, go listen to it now. Please, I beg you. It recently took home a Grammy for Best Blues Album of the Year. It deserved it, plus some more. It is real music. It is amazing. It is breathtaking and rowdy...it's got something for everyone.

So, collard greens. You either love 'em or you hate 'em. I LOVE 'em, This is a classic southern preparation, but I love collards prepared almost any way. Most recently, I've been digging them raw. Thinly sliced into ribbons, left to marinade in a vinaigrette for a fresh and crunchy salad. Or in veggie juices. But this one pot meal is a great one to have when you got a whole lotta greens to cook.

So let's start with how to prepare them. For a quicker braise and simple dish like this or most dishes that call for collards, you should de-stem them. The stems are tough, fibrous, little buggers. You can use the stems, but it is still recommended that you de-stem them and then chop us the stems to be added to your aromatics. Or add the stems to your compost, chicken run, or even your juicer...which is where mine will be headed!


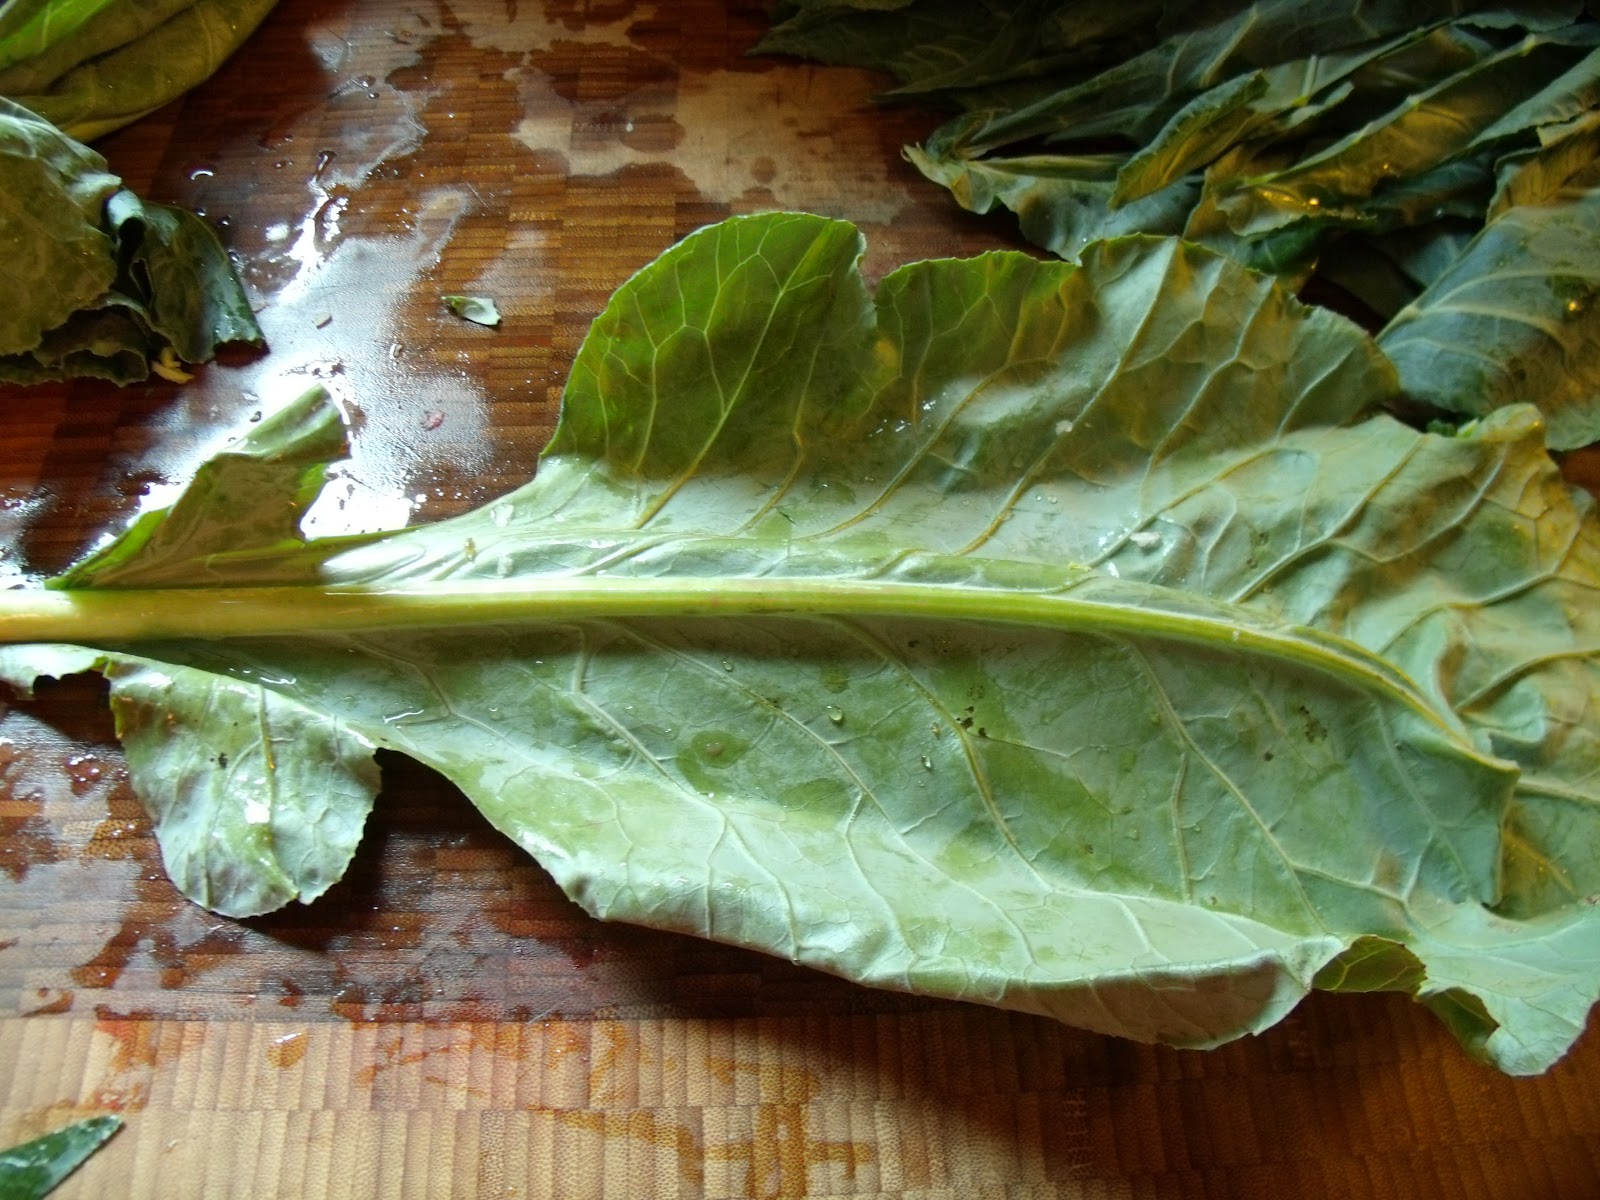
Lay a full leaf down, rib side up, so the underside of the leaf is facing you. 


Then all you have is two cuts. I was taking pictures with this knife in my hand, so sorry they aren't the best. Your first cut is right only the rib on one side. Cut all the way down until the stem loses most of it's width.


Then do the same to the other side and cut all the way across the stem to detach. Repeat. A bazillion times.


When you have a pile of destemmed leaves, pile them up and roll them up tightly like a cigar. Then slice into ribbons. Like so...


Allow plenty of time to prep collards. It takes longer than you think, but you get into a nice little rhythm, especially if accompanied by an album like Revelator!


A note on the sausage. This is really good andouille sausage. If you can, find some. Steer away from any big name sausage companies, ahem, Johnsonville, and branch out a little bit. I know this isn't always available to everyone whether it be the price tag or selection, but really good andouille sausage it really good and you can taste it in this dish.


I think one of my most favorite colors in the world is the bright green that leafy greens turn when just barely cooked. Kale, collards, even spinach all achieve this color just as they become heated. The color they become after cooking is not what I'm talking about, but this bright, vivid green is just lovely.


Once the collards cook down and you hit them with some thickened milk, it's time to lay the biscuits down. Grind some fresh black pepper on top and throw them in the oven.


One Pot Collards and Cornbread

Ingredients:
  • 1 cup flour (sub gluten-free if that's your thing)
  • 1/2 cup course cornmeal
  • 2 1/2 teaspoons baking powder
  • 1/2 teaspoon salt
  • 1 teaspoon honey
  • 5 TB butter, cold, cut into small pieces
  • 3/4 cup buttermilk
  • 1/2 lb. Andouille sausage (I promise this dish is better if you splurge on really really good looking sausage)
  • 1 large onion, chopped
  • 3 garlic cloves
  • 4 cups stock: vegetable or chicken, homemade preferred
  • 3-4 lbs. collards greens (I used 4 collard plants and it was probably closer to the 4-5lb. range)
  • 1/2 cup milk or cream
  • 2 TB cornstarch or arrowroot powder
  • S & P
Directions:
  1. Make the cornbread biscuits. Throw flour, cornmeal, baking powder and salt into your food processor. Give it a whirl. 
  2. Add the honey and butter and pulse until the butter is in small pieces and looks like small peas. Add buttermilk and pulse until dough comes together.
  3. Remove dough onto a floured surface. Knead together until it comes into a pliable dough. You may need to add some more flour or cornmeal. Roll dough out to 1-inch thickness and cut into rectangle biscuits. Lay biscuits on a parchment-lined baking sheet and refrigerate until you're ready for them.
  4. In a large pot (you have two options here - cook in a large pot and then pout finished collards into a baking dish or cook in your baking dish, you can see I cooked in my large dutch oven) over medium-high heat, add sausage and brown. Your sausage may or may not need some extra fat, so have some EVOO on hand just in case it really starts sticking. 
  5. Turn heat down to medium. Push sausage to one side when you have some nice brown edges and add onions. Saute in sausage fat until translucent, about 8 minutes. Add garlic, saute 1 minute, until fragrant. 
  6. Add stock. Raise heat to bring to a simmer and turn back down to maintain this simmer.
  7. Begin adding collards in batches, stirring to incorporate. Each batch should take on the vivid bright green mentioned above before you add the next batch. It took me about 4 batches. Let simmer until collards are tender and stock is reduced, about 30 minutes. 
  8. Preheat oven to 375. 
  9. Once collards have cooked. Add cornstarch/arrowroot powder to 1/2 cup of milk or cream. Whisk until smooth. Add to collards. Stir to incorporate. Mixture should begin thickening. 
  10. Assemble! At this point, take out your biscuits and place on top of collards mixture. They should be slightly overlapping. Grind fresh black pepper on top and place in preheated oven. Bake for 40-50 minutes, until biscuits are browned on edges and collards are bubbling. 
Best enjoyed with a crisp and almost fruity IPA, unless of course, you're pregnant. Kombucha will do just fine.

March 20, 2012

Growing more than food


I had all these wonderful posts planned for spring! Between food and all the activity on the farm, but none of that has happened because, well, I got pregnant!

I haven't had the energy or the appetite to post! My usually ravenous diet of extravagant recipes has died. I eat whatever I can force down my mouth...which lately has been potatoes. And milkshakes. And popsicles. A lot of friggin' popsicles. 

Anyways, my appetite is slowly returning as my belly is growing. And my energy level is getting there. Hopefully, I can get a couple updates up in the next few weeks. Chicken mansion is complete and we have 6 lovely ladies. We are about to add some baby chicks too!

Food is growing! Radishes, lettuces, greens, peas, yummm! But for now, I gotta focus on my growing body. Holy cow, we're gonna be parents....just wild. Enjoy the adorable photo we came up with to share :)

February 22, 2012

The best breakfast muffins

Breakfast is something I perpetually have to plan for. I am not a morning person, so the thought of getting up earlier than I have to to cook eggs and bacon, well that's a nice thought and all, but it will never happen during the week. And trying to get a really healthy, homemade breakfast in fast, can be difficult.


Our standards are homemade yogurt with toppings (jam/honey/fruit, nuts, granola, etc.), homemade bread with almond butter, jam, or cinnamon butter and honey, overnight steel cut oats, smoothies (almond butter, banana, and milk is our fave!), and muffins. I have gotten in the habit of making a batch of muffins on Sunday and then freezing them. We take them out in the morning and throw them in the microwave for 30 seconds to a minute and enjoy hot, homemade muffins for breakfast.


This is by far, the best, most nutritious recipe I have tried. It only has 1/4 cup of brown sugar. It uses both oats and whole wheat flour AND it's just a template so you can add whatever your heart desires. The only downside is that the recipe does take some preparation. It calls for the oats to be soaked in buttermilk (or soured milk) for an hour before cooking time. This requires some planning, but the rest of the recipe comes together in 5 minutes. 


So far, I have made fresh blueberry muffins and raspberry-almond muffins. It's rhubarb season, so really looking forward to picking up a few stalks and throwing in some cardomam for the next batch. If you try this recipe, let me know what flavor combinations you try or even ones that sound good! I have been dreaming of the following combinations:
  • Fresh blueberries and ground ginger
  • Raspberries and vanilla bean
  • Rhubarb and cardamom
  • Grated carrots and raisins
  • Diced apple, extra cinnamon, and walnuts
  • Peaches
  • Frozen or fresh cherries and chocolate chips

The best breakfast muffins
Adapted from here.


Ingredients:
  • 1 cup buttermilk (OR alternatively 1 cup milk with 1 tspn. lemon juice of white vinegar added and let sit for 5 minutes before proceeding)
  • 1 cup rolled oats (not the quick kind)
  • 1 large egg, room temp
  • 1/4 cup brown sugar
  • 1/2 cup butter, melted and cooled slightly (I want to try replacing this with coconut oil too!)
  • 1 tspn. vanilla extract
  • 1 cup plus 2 TB flour (I use whole wheat)
  • 1/4 tspn. salt
  • 1 tspn. baking powder
  • 1/2 tspn. baking soda
  • 1/4 tspn. nutmeg, freshly ground
  • 1/2 tspn. cinnamon
  • Add-ins of your choice
Directions:
  1. Combine milk and oats in a large bowl and let stand one hour.
  2. Preheat oven to 375 degrees. Grease a 12-cup muffin tin and line with cupcake papers.
  3. Crack the egg into the oats; add brown sugar and mix to combine. Stir in melted butter and vanilla.
  4. Sift remaining ingredients into the bowl: flour, salt, baking powder, baking soda, and spices. Gently fold into batter, taking care no to over mix.
  5. Sprinkle add-ins and additional flavorings and combine gently.
  6. Spoon into muffin tins. 
  7. Bake until light brown on top and muffins spring back when gently touched, about 10-12 minutes. This will take longer is you use fresh or frozen fruit additions.
  8. Remove and enjoy!
* I keep a few out fresh but then I fit 9 into a large, freezer ziploc bag and throw it into the freezer. Pop in the microwave for 30 seconds in the morning and enjoy a tasty, warm muffin for an easy breakfast!


November 5, 2011

Tomato Sausage Risotto

Menu: Tomato Sausage Risotto, if you really need some more greens, I suppose a nice green salad would do, I didn't have the energy this night

Music Man picked: Ray Charles, Ray Charles.  The master's debut album featuring songs such as I Got a Woman, Hallelujah I Love Her So, and one of my all time personal faves, Drown In My Own Tears.  Comfort music for a comfort meal.  This music wraps you up like a warm, soulful blanket on a cold, rainy day and the food feels the same way.  When you need that certain something to hit ya just where you need it, dial up some Ray and fire up the risotto pan.  Most people think the blues are a sad music meant for sharing in the downtrodden spirit...on the contrary, I've always seen true blues music as comfort for your soul when words alone can't do the job.  This music, and this meal, are sure to do the same! -BJ

If you couldn't already gather, we have a serious love of risotto. It is our go-to one pot meal. That's why we love it so. Throw stuff into one pot, stir, add, stir, and then enjoy creamy-yummyness. That's a word, right? I like risotto with lots of things, like beets, squash blossoms, Clemson-themed, etc.


I love this risotto because it has the usual qualities of a risotto, a creamy texture that melds the flavors together without turning to mush. Risotto or arborio rice (there are other types of rice that are more authentic to use, but this is the closest that is easy to find in any supermarket!) is a rice grain that takes on the flavor of whatever you add to while adding a starchy, velvety component that is hard to find elsewhere. Risotto is a blank canvas waiting to be flavored up to your liking. 


However, I love this risotto for its differences too. Instead of the traditional water or stock base, this risotto uses tomatoes and tomato juice for a very flavorful and colorful final product. Consistent with the other recipes, I keep a small sauce pot on the back burner of warmed liquid. This time it happens to be the juice from a 28 oz. can of tomatoes plus some water. I love the tangy, slightly acidic flavor this adds to the creamy nature of this dish.


The overall dish doesn't differ too much from your normal pasta with meat sauce flavors, but definitely breaks up the monotony of it. We have made this a few times and enjoy it everytime. So, if you're looking for something to spice up your pasta night or a different take on spaghetti and meatballs, give this recipe a try!


Enjoy :)


Tomato Sausage Risotto
Adapted from Martha Stewart via Smitten Kitchen

Ingredients:
  • 1 28 oz. can of diced tomatoes
  • EVOO
  • 1 lb. Italian sausage, mild or sweet (if in casings, remove)
  • 1 small-med. onion, chopped
  • S & P
  • 1 cup Arborio rice
  • 1/2 cup dry white wine (optional)
  • 1/2 cup parmesan cheese, grated
  • 1 bunch of spinach, finely chopped
  • 2 TB butter
  • Garnishes: more parmesan cheese or parsley, goat cheese, basil
Directions:
  1. Drain the tomatoes over a bowl to reserve all the liquid. Set tomatoes chunks aside.
  2. Combine juice from tomatoes with 3 cups of water in a small saucepan. Bring to a simmer and keep warm on your back burner.
  3. In a large-medium saucepan, heat oil, add sausage and onion, and season with S & P. Cook sausage, breaking it up with your cooking utensil until sausage is pretty much cooked through and onions are softened, 3 to 5 minutes. Remember this will just keep cooking, so no need to cook everything through and through right now.
  4. Add rice and tomatoes, stirring to combine and cook for 1 to 2 minutes, letting the rice coat and lightly toast.
  5. Add wine. Cook and stir until absorbed, about 1-2 minutes, while stirring.
  6. Add about 2 cups or 3 big ladles full of tomato liquid to the risotto. Cook this over a soft simmer, stirring occasionally to re-distribute the liquid and make sure all the rice is being cooked, about 5 minutes.
  7. Add 1-2 ladles full of liquid at a time, waiting until the prior batch is almost completely absorbed before adding more. Stirring to combine and re-distribute after each addition, until rice is creamy and tender, about 25 minutes (you may or may not use all of the juice, I didn't on this batch). Taste testing is strongly encouraged.
  8. Remove from heat. Stir in spinach, parmesan, butter, season with S & P and add some crushed red pepper if you like some spice! We served with parsley and goat cheese on top.
*If you use a gas range, risotto making is much more fun (sorry electric stove peeps). If you don't feel like using up another pot on your back burner, don't! Just crank up the heat each time you add liquid and bump back down as it comes to a simmer. You can control the slowness and quickness of the liquid being absorbed. This is called fun in my house. I definitely recommend trying this tactic out. Start with just increasing the heat when you add the wine, bump it back down when it simmers and see how you feel. Like I said, F-U-N!


October 22, 2011

Fall Root Vegetable Pot Pie with Sweet Potato Biscuits

Menu: This bad boy only needs a beverage. It was plenty of food. The boys had some Sam Adams Oktoberfest and I had Roots Cab Sav, delightful!

Music: We were entertaining a guest, so I just threw on Avett Brothers Pandora. I love using Pandora when entertaining, so you're not constantly getting up to change CD's, records, playlists, etc. It was a perfect, easy going blend for a quintessential Fall meal!

This meal was beautiful! I had bought (along with the rest of the world) the Living Social deal for Whole Foods a while back. I was up in Greenville so I decided to stop in and cash out my coupon. I never go to Whole Foods with a shopping list. You end up spending a ba-zillion bucks (yes, that is an exact figure). I go to Whole Foods to grab a few things that grab my attention and then stop elsewhere to round out a meal. The first thing I saw when I walked in was these beautifully ugly organic purple sweet potatoes from a nearby farm in NC (the dark looking potato between the sweet potato yam and parsnips). Then I remembered this recipe and set out grabbing lots of root vegetables and what I would need.

See the first blooms of Zinnias from our garden!


The veggies with lots of olive oil and herbs waiting to be roasted. Isn't the purple just beautiful? The purple sweet potato tasted just like a sweet potato. I didn't pick up any differences, except in the spots that I didn't fully get the skin off, I noticed some very bitter bites. The skin was very thick and gnarly. 


The browned, caramelized, yummy veggies. They also go by the name of "Fall in a Bowl". As BJ said, I could just eat that right there!


I could have also cut the biscuits a bit thicker. They had great flavor, but didn't rise well as I used whole wheat pastry flour. 


I would make a few changes upon making this again. First of all, I would add mushrooms to the béchamel. Few a few dried mushrooms, rehydrated, then chopped into the base of the bechamel would really round out the earthiness of the dish. Second, I didn't add wine, as I didn't have any on hand. If you don't, I would suggest adding a squeeze of lemon juice or something to brighten the flavors. That was missing from my dish. Third, I went with turnip because I couldn't find a celery root. I would most definitely go with celery root if given the option. Man, just writing all those changes really makes me want to make this dish again soon!

I hope you enjoy this dish on a nice chilly night soon! Let me know how it turns out!


Fall Root Vegetable Pot Pie with Sweet Potato Biscuit Topping

Ingredients:
  • About 1 lb. brussels sprouts, stem cut, outer leaves trimmed, and halved
  • 3 carrots, peeled and cut into 1/2 inch pieces*
  • 3 parsnips, peeled and cut into 1/2 inch pieces*
  • 2-3 medium sweet potatoes, peeled and cut into 1/2 inch pieces*
  • 1 rutabaga, celery root, or turnip, peeled and cut into 1/2 inch pieces*
  • EVOO
  • S & P
  • 2-3 tspn. Herbes de Provence (or dried thyme, I had this on hand)
  • 1 tspn. sage
  • 1 large onion
  • 6 garlic cloves, minced
  • 4 TB butter
  • 1/4 cup flour
  • 2 1/2 cups of milk
  • Big splash of white wine or sherry, optional
  • Pinch of nutmeg, thyme, cayenne
  • Unbaked sweet potato biscuits (Recipe below)
  • You could always make this with meat, just throw chicken in to roasted veggies and combine with béchamel. 
Directions:
  1. Heat oven to 425. Toss all the chopped veggies with ample amounts of EVOO, S & P and dried herbs. Spread into one layer on multiple baking sheets. Put into oven and roast. Open and stir every 20 minutes or so. They are done when your kitchen smells delicious and veggies are brown in spots and tender in the middle. Remove from oven, set aside. Keep oven on!
  2. In a saucepan, heat butter over medium heat. Add onion. Saute until translucent, about 5-8 minutes. Add garlic. Saute for a minute. 
  3. Add flour to onion mixture. Stir until fully incorporated and cooked, about 2 minutes.
  4. Next, get ready to whisk in the milk! Go very slowly at first, incorporating the milk by a 1/4 cup at a time or so. Whisking completely into the flour and then adding more. This helps prevent lumpy béchamel!
  5. Add wine if using, remaining herbs, and S & P to taste. 
  6. Combine veggies and béchamel. Top with unbaked sweet potatoes biscuits, arranging them to your heart's desire. 
  7. Put into oven and bake for about 20 minutes or until the biscuits are puffy a light browned on the top. 
  8. Let rest for a few minutes and then devour. 
*If using homegrown veggies or organic from a trusted source, skip the peeling and just give a nice scrub. The skins always contain the best nutrients!

Sweet Potato Biscuits
  • 1 small-medium sweet potato, peeled and cut into 1/2 inch pieces (definitely peeled here)
  • 1 3/4 cups flour (I used whole wheat pastry, as expected they didn't rise as well)
  • 1 TB. brown sugar 
  • 2 1/2 tspn. baking powder
  • 1/2 tspn. baking soda
  • 1/2 tspn. salt
  • 7 TB cold butter, cut into small pieces
  • 1/3 cup cold buttermilk or yogurt
Directions:
  1. In a small pot, cover sweet potatoes with water, bring to boil, then simmer for 20 minutes until potatoes are very tender. Drain well, then smash up with a fork. Reserve 3/4 cup of mashed potato and let it cool.
  2. In a bowl, combine dry ingredients (flour through salt). Whisk to combine. 
  3. Press small pieces of butter into dry ingredients by squishing each piece in flour mixture. Then combine all the dough with your hands. It will resemble very course sand. Alternately, this can be done with a pastry cutter or food processor. 
  4. Stir in buttermilk and sweet potato mash until thoroughly combined.
  5. Place dough onto generously floured surface. Knead a few times until you have a nice consistency. 
  6. Roll dough out into about 1/4 inch thickness and cut into biscuits, however you please. I used a drinking cup, but you could use fun cookie cutters, squares, whatever!
  7. Place on pot pies or bake at 425 for about 20 minutes.

October 5, 2011

Remembering

I have a terrible memory. My sister can recall memories from our childhood that I just smile and nod as she recounts the details, wishing that I could remember things like she did.

As I was driving away from our new house the other evening (we have this beautiful 1/4 mile dirt road driveway lined with fruit trees and horses on both sides), I had this overwhelming desire to remember the moment. It was an ordinary moment, but it was filled with such intense emotions that I wanted to capture it here

We had just finished a 3 hour painting session in the master bedroom of the new place. It looked like this...


I know it's difficult to see, but that my friends, is baby blue sponge painted walls. With a blue and white country pattern print VALANCE. That is what you call that, right?

If I had lots of money, I would also rip up the carpet, but let's be honest, if I had lots of money, I wouldn't be renovating a single wide :) So, we painted the walls white. Like white white. The color is actually called "Moon Rise". The true sign on a re-design, re-model expert is when she picks colors based of names...OH, that's me!

So back to the whole remembering thing. So, we had just finished a 3 hour paint session. We were covered in paint and sweat (no AC yet folks). We did a bit of poking around the garden and were spent. I hopped in the Jeep to head back to the lakehouse and on the drive out (pics below of our driveway) is when the rush of feelings hit me. 


REMEMBER THIS MOMENT. Remember the feeling of working so hard for something you want. Remember the sweat and paint stains, but most of all remember the feeling of total fulfillment. Remember the feeling of your heart feeling like it's overflowing with happiness. Happiness for what is to come, the future, but also the moment of realizing you made the right decision in moving back in with the rents to accomplish this next step :)

Alright, enough cheesiness. I promise more pics of the new place and some recipes soon. We've been cooking!

September 29, 2011

Thought for the day

Thought for the day (adapted from an Adam Carolla metaphor...obviously from BJ)

Learning and living on the farm will be like a big gin rummy game. Start with the hand that is dealt to you and then slowly add and keep the things that are working, productive, and bring you joy, all the while not being afraid to discard things that don't fit in with the greater mission or don't work out the way you envisioned.  Your hand will always evolve into something better and will most certainly not ever end up how it started or how you could have foreseen, but a healthy dose of risk-taking combined with an intelligent, informed game plan will ensure that both the process and result will always be rewarding.


We know how to play some mean gin rummy, so this whole farm thing should be easy-peasy...according to Adam Carolla...


 If this is our Queen of Spades...
This is clearly the Ace! Hopefully, in the next few weeks we will have some updates about the King...chickens and goats!


September 9, 2011

Seasons of Change.

A cleared home site.

The meager beginnings of a farm.


Learning how to grow food in red clay.


 A single wide.


A home on site (and Jade)!


Celebrating 3 years of marriage!


Beautiful SC and our new homestead!


September 2, 2011

The top ten since being back in SC!

  1. Living in the same state as my husband. 
  2. The beautiful, haunting, heavy mist in the mornings.  
  3. Local farm stands on every country road. This area knows beefsteak tomatoes, summer squash, peaches, and okra, like whoa.
  4. Green, rolling mountains.
  5. Publix. 
  6. Discovering that water skiing could be considered a work-out.
  7. Red sunrises and sunsets over the lake.
  8. Being in SEC football land (i.e. people who actually know something about college football).
  9. Hearing the word "y'all" in a non-ironic context. 
  10. The wet, earthy, green, musty smell. I just missed it, y'all :)
  11. Okay, I know it was supposed to only be 10, but watching Jade jump in her very own pond...here's a preview!